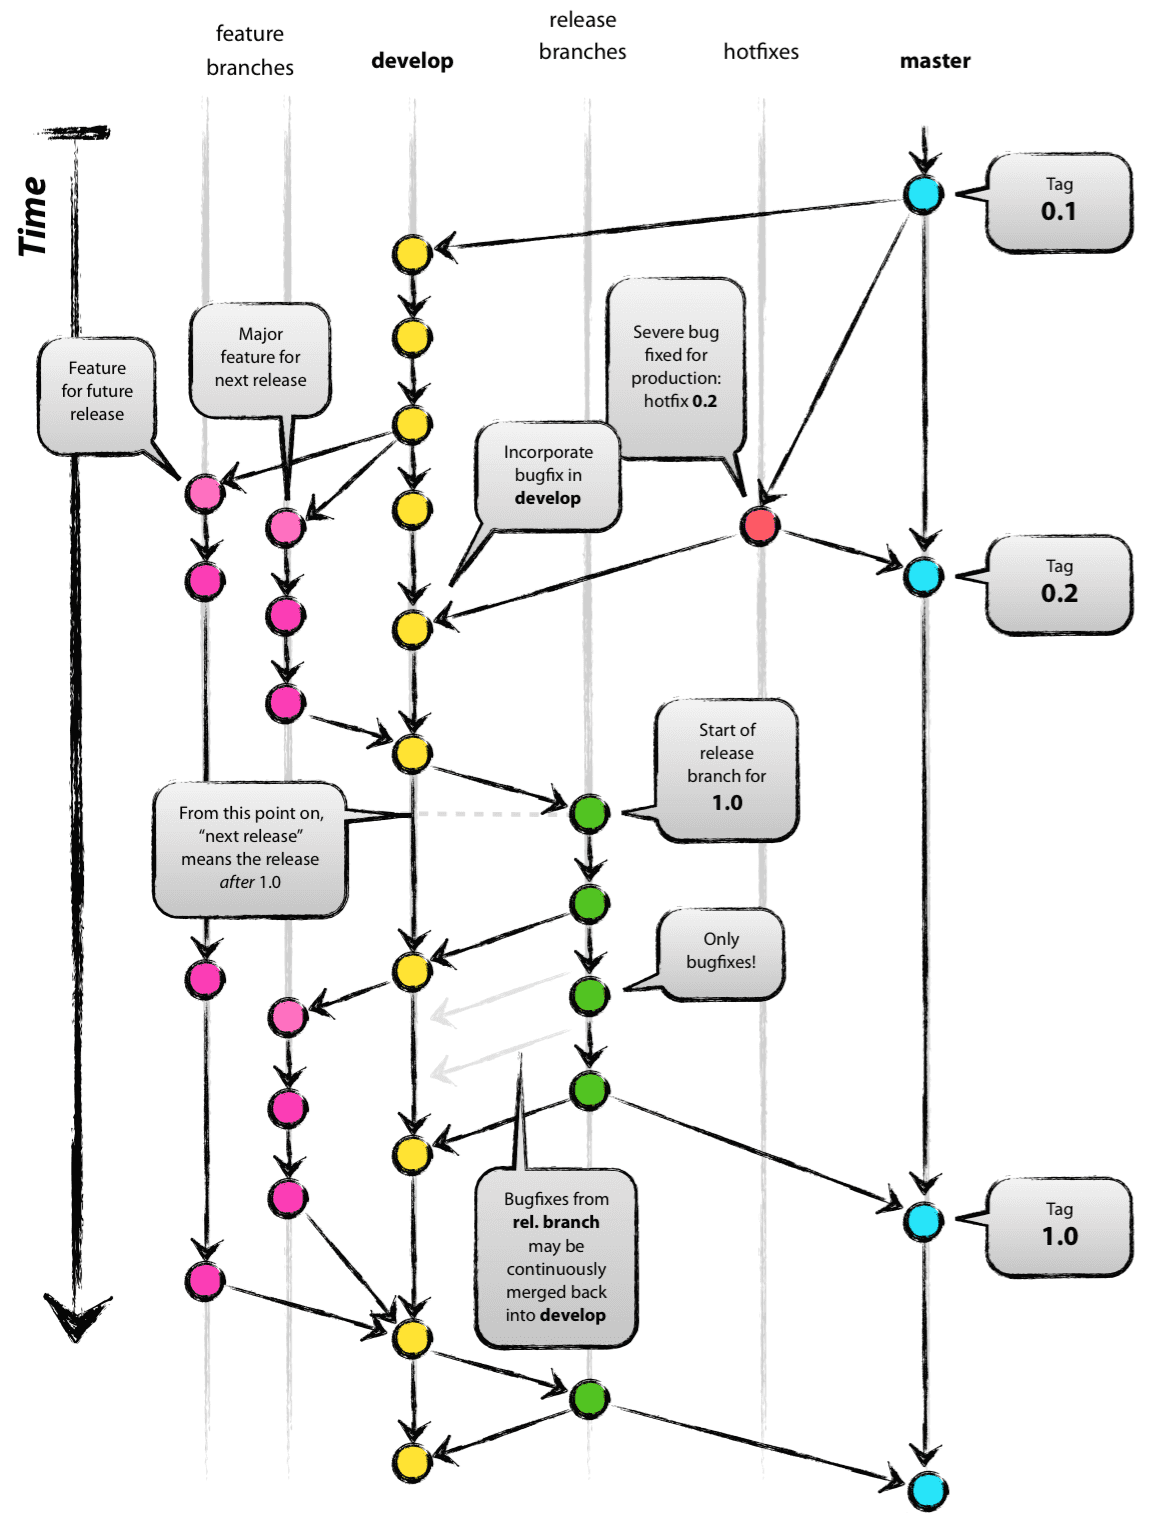
Gitflow / Pull Request
November 2021 (412 Words, 3 Minutes)
Gitflow

origin이 upstream, local이 downstream 으로 생각하면 된다.
- feature 브랜치에서 feature1을 분기하여 작업
(feature-user)$ git fetch origin
# feature-user에서 feature1 브랜치 생성
(feature-user)$ git checkout -b feature1 -track origin/feature-user
$ git commit -m "feature1에서 커밋 생성"
# 커밋 2개를 squash한다면
(feature1)$ git rebase -i HEAD~2
# work branch를 feature-user에 rebase
(feature1)$ git pull -rebase origin/feature-user
(feature1)$ git push origin feature1
# 이 후 github에서 pull request
# 리뷰 후 pull request를 merge
git pull -rebase origin/feature-user는 커밋을 순차적으로 만들기 위해origin/feature-user의 최신 상태에서 시작하도록 rebase를 수행한다. - develop 변경사항을 feature-user에 업데이트
(feature-user)$ git fetch origin (feature-user)$ git merge --no-ff origin/develop - develop에 feature 반영
(develop)$ git fetch origin
(develop)$ git merge --no-ff origin/feature-user
(develop)$ git push origin develop
(출처) https://techblog.woowahan.com/2553/
Rebase
커밋 히스토리가 깔끔해지나 협업에서는 위험할 수 있다.( 혼자할 때는 상관없으나 협업에서는 push 이후에는 사용하지 말것 )
(출처) https://velog.io/@kwonh/Git-Rebase%EB%9E%80
git branch 삭제
(master)$ git push origin --delete newbranch
원격 브랜치를 바로 삭제할 수 있다.
(출처) https://ifuwanna.tistory.com/284
Pull Request 테스트 자동화
gitlab-runner
(참고)
- https://velog.io/@sum3533279/gitlab-runner-shell-execute-%EB%B0%B0%ED%8F%AC-%EC%9E%90%EB%8F%99%ED%99%94%EB%A5%BC-%EC%9C%84%ED%95%9C-%EC%84%A4%EC%A0%95-%EB%B0%A9%EB%B2%95
- https://microcode.tistory.com/5
[ 설치 ]
- binary로 설치
아래에서 처럼 설치하는것이 좋음. apt-get install gitlab-runner은 버전이 맞지 않을 수 있음
$ sudo curl -L --output /usr/local/bin/gitlab-runner "https://gitlab-runner-downloads.s3.amazonaws.com/latest/binaries/gitlab-runner-linux-arm64"
$ sudo chmod +x /usr/local/bin/gitlab-runner
$ sudo useradd --comment 'GitLab Runner' --create-home gitlab-runner --shell /bin/bash
$ sudo gitlab-runner install --user=gitlab-runner --working-directory=/home/leeyujin/gitlab-runner
$ sudo gitlab-runner start
- docker로 설치 gitlab-runner 컨테이너 재시작시 configuration이 있어야 하므로 아래와 같이 named volume을 사용한다.
(출처) https://docs.gitlab.com/runner/install/linux-manually.html
- gitlab-runner 컨테이너에 configuration volume을 mount하여 사용한다.(옵션)
$ docker run -d --name gitlab-runner --restart always -v /srv/gitlab-runner/config:/etc/gitlab-runner -v /var/run/docker.sock:/var/run/docker.sock gitlab/gitlab-runner:latest
- configuration volume을 사용하여 data volume을 mount한다.
$ docker volume create gitlab-runner-config
$ docker run -d --name gitlab-runner --restart always -v /var/run/docker.sock:/var/run/docker.sock -v gitlab-runner-config:/etc/gitlab-runner gitlab/gitlab-runner:latest
(출처)
- https://docs.gitlab.com/runner/install/docker.html
- https://hihellloitland.tistory.com/65
Jenkins CI/CD
pullRequest는 work branch에서 작업한 코드를 merge 이전에 검사를 자동화할 수 있는 기능이 많다. 빌드-테스트를 자동으로 실행할 수 있는 점은 CI 관점에서 이점이 있다.
Jenkins의 Github Pull Request Builder을 활용하여 work branch의 빌드 상태를 검사할 수 있다.
즉, Jenkins의 Github Pull Request Builder 플러그인과 Github Webhook을 이용하여 Pull Request를 하면 자동으로 빌드 환경을 구축하면 된다.
- Github - Jenkins 연동
- Jenkins에서 Github 코드를 받아 빌드하여 결과를 리포트한다.
- 인증 토큰을 설정하기 위해 Github의 Personal access tokens을 저장해둔다.
- Jenkins에서 Github Pull Request Builder 설정
- pluginManager에서 해당 플러그인을 설치한다.
- Jenkins에서 Build Job을 설정한다.
- Jenkins job에서 GitHub Pull Request Builder 플러그인으로 빌드를 유발시킨다.
- Github에서 Repository Webhook이 자동으로 설정된다.
- Github에서 Branch protection rules를 설정한다.
- 빌드가 실패하면 merge를 하지 못하도록 방지한다.
이외 github actions을 통해 테스트를 자동화할 수 있다.
gitlab과 연동하기 위해서는 https://dejavuqa.tistory.com/143에서 참고한다.
(출처)
- https://taetaetae.github.io/2020/09/07/github-pullrequest-build/
- https://forl.tistory.com/139
(참고)
- https://velog.io/@whdgh0331/vagrant-%EC%97%90%EC%84%9C-Jenkins-%EC%99%80-git-push-git-pull-request-builder-%EC%A0%81%EC%9A%A9-5ck3pmigy3